Friday, June 17, 2011

Harry Potter Knitting

Growing up with a librarian mother, I have always been a book-lover.  I fondly recall the hours spent in the basement-children’s section of her library with my good friends Bilbo and Frodo, Charlie, Peter Pan, Alice, Bastian and of course Peter, Edmund, Susan and Lucy.  Unsurprisingly, my favorite birthday presents were books and bookstore gift cards.  It was just after my eleventh birthday, that I convinced my parents to take me to the local Borders where I first picked up Harry Potter and the Sorcerer’s Stone.  I remember reading the cover and being interested (having read, quite indiscriminately, any fantasy or science fiction book I could get my hands on) so much that I had read the first chapter before leaving the store.  After tearing through the story at super-human speed, I discovered (to my great delight) that there was more!
Now, of course, both Harry and I are grown, he defeating the evil Lord Voldemort, and I… well… I read about him defeating Voldemort, does that count?  And, with the final installment of the Deathly Hallows due in theaters this July, we are finally at the end of a rather magical era; no more waiting in line for midnight movie showings, no more Harry Potter costume parties, and sadly, no more books!  I therefore offer up this knitting experience to you as one last Harry Potter hurrah.  Raise your goblets (filled with pumpkin juice and butterbeer, no doubt!) and join with me in a toast to the Boy Who Lived, and the Woman Who Brought Him to Life!
Harry’s Christmas Socks
As most Harry Potter fans who are also knitters will tell you, Rowling includes characters who knit in almost every book in the series.    Mrs. Weasley sends Harry and Ron lovely knitted sweaters every year for Christmas, Hermione learns how to knit wooly hats and scarves for the Hogwarts House-Elves and even Hagrid knits some sort of yellow circus tent (in the Sorcerer’s Stone if you were wondering).  It should come as no surprise, then, that house-elves, those creatures most gifted in cleaning up after humans and practicing the domestic arts, are accomplished knitters!
Dobby now handed Harry a small package, which turned out to be --- socks. 
“Dobby is making them himself, sir!” the elf said happily.  “He is buying the wool out of his wages, sir!”
The left sock was bright red and had a pattern of broomsticks upon it; the right sock was green with a pattern of Snitches.
“They’re … they’re really … well, thanks, Dobby,” said Harry, and he pulled them on, causing Dobby’s eyes to leak with happiness again.
(Excerpt from Harry Potter and the Goblet of Fire, Chapter Twenty-Three: The Yule Ball, by J.K. Rowling)
I get the feeling that Harry might have found those socks a bit strange (can’t imagine why) but they sounded delightful to me, so I was thrilled to discover a pattern for them in Alison Hansel’s book of knits based on those described in the Harry Potter books and films, Charmed Knits (pg. 104-108).   Her pattern features two repeats of a Fair Isle snitch and broomstick patterns on each cuff with identically worked short row toes and heels.  Her instructions were easy to follow (although, the explanation for the short row toe/heel was not with the snitch/broomstick sock pattern, so you do need to skip around in the book a bit) and the short row toe/heel knit up quickly.  I am not a big short row toe/heel fan because the heel does not end up being particularly reinforced (and we all know that socks are the only knitted clothing items that wear out) and because you end up using the Kitchener Stitch to graft together 32 stitches to finish the toe, which takes a lot longer than grafting 8 stitches for a conventional toe.  However, if you are an apprehensive first time sock knitter, the short row heel would probably be the easiest heel to work.
For the second pair of Harry's Socks that I knitted, I decided to knit them my way,  with a longer cuff on each sock featuring only one repeat of the broomstick motif, and two repeats of a shortened snitch motif (for this I skipped working rows 10, 11 and 12 of the snitch chart on pg 108).  (I think the snitches look more “snitch-ly” with a more round golden ball).  I also worked the heels and toes in gold for both socks (because they look pretty!) knitting a heel flap, turn and gusset, as well as a more conventional toe (scroll down for directions).
When knitting Fair Isle motifs, I usually like to use only one kind of yarn for a uniform look.  However, for these socks I ended up using Aussi Sock by Oasis Yarn (an Aussi Merino/Nylon blend in Oak Moss, Natural and Cherry Tomato that is super soft) with either Trekking XXL or Opal (both are wool/nylon blends as well, in gold and variegated brown).  (I actually don’t know which brand of yarn I used for the gold and brown colors because I started these socks a long time ago, and either lost or ate the ball bands, but I have a suspicion that both yarns are Trekking XXL because they look/feel like it).  The Aussi is a little bit fluffier than the Trekking, but I think that for the Fair Isle pattern, the combination of yarns looks really good.
For more Harry Potter-inspired knitting check out Hansel’s book or click here for a great (free!) listing of patterns and links.  Also, Opal created a line of variegated sock yarns based on Harry Potter characters (which is out of production, but you might find is floating around at your yls!).  Happy Knitting!
My Heel and Toe Directions:
Heel Flap:
Work sock until it is the desired length to the heel.  Then knit 16 stitches past beginning of round and turn work (knitting flat) knitting the heel flap on the next 32 stitches (starting with a WS row) with alternating rows of RS: sl 1 k 1, WS: sl 1, P to end. 
Turn Heel: 
When heel flap is desired length (14 or 15 slipped stitches at the side of the flap), on RS, K 17, ssk and K1, turn work, Sl 1, p3, p2tog, p1 and turn, continue to work as follows, knitting to 1 stitch before gap and ssk k1 on the RS rows and purling to 1 stitch before gap and p2tog p1 on WS rows until all stitches of the heel flap have been worked.
Gusset:
Needle 1: Knit across all heel flap stitches and then pick up and knit 15 stitches on the side of the heel flap.  Needle 2: Knit across the stitches for the top of the foot.  Needle 3: Pick up and knit 15 stitches from the other side of the heel flap, then knit 9 stitches of the heel flap. This is where each round now begins.  Row 1: Knit on needle 1 to the last 3 stitches, k2tog k1, knit all stitches on needle 2, k1 ssk then knit remaining stitches on needle 3.  Row 2: knit.  Repeat these two rows until 64 stitches remain total.
Toe Decrease:
Row 1: On needle 1, knit to last three stitches, k2tog, k1, on 2nd needle k1, ssk knit to last 3 stitches k2tog k1 and on needle 3 k1, ssk knit to end of needle.  Row 2: knit.  Repeat rows 1 and 2 until 16 (or desired amount of) stitches remain.   Then, using the Kitchener Stitch, graft the toe together.   (My favorite explanation of the Kitchener Stitch is from Knit Christmas Stockings edited by Gwen Steege, page 93, because of the easy to follow illustrations!  That book is how I learned to knit socks.)
Friday, June 3, 2011

One More for Winter!

And this brings us almost to date with my finished projects, or at least the Vogue Knitting ones!

Winter 2009/2010 Issue
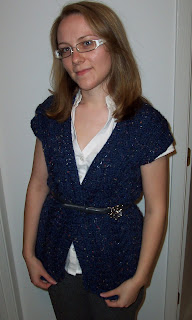
I know that we are getting on towards summer, and that very soon I will (like all Chicagoans) start complaining about the heat and the cost of AC, but when I found the Karen Garlinghouse vest on page 54, I had to knit it.  (And let’s face it; the weather has been chilly lately, so a chic, business-casual vest is perfect for the weather!)  While knitting textural elements like cables is time-consuming when there are a million cables in every other row, I adore how cables look (which explains why most of my sweaters feature cables). 
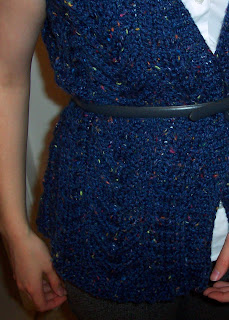
I pulled 5 skeins of Patons Shetland Chunky Tweed in blue from my stash, which is technically 1 skein short of the yardage called for in the pattern ( a fact I chose to ignore while obsessively checking that Patons was still making their Shetland Chunky Tweeds; they are).  I shortened the vest’s length below the waist by 3 inches shortened and knitted a narrower collar to compensate for the wrong yardage, which worked pretty well; I have 2 yds of the yarn left over.   (Admittedly, the collar change did not begin as a purposeful alteration...the vest collar and left and right sides finishing instructions were not clear to me until I had put the left and right sides’ ribbing in wrong, and at that point I decided to leave them and change the collar). 
The biggest Issue with this vest (besides me reading the collar and sides ribbing wrong) was that the yarn bleeds.  My hands don’t sweat much as I knit (or ever for that matter), but I did end up with blue fingernails and palms.  I’m not sure if the yarn dyed my needles; they just happened to be blue.  I just washed the vest (in the washing machine in cold water on gentle, as the label suggests) which caused the yarn to pill and fuzz a bit (this always saddens me) but it appears that the vest no longer bleeds. Cross your fingers that I can pair it with a breezy cream top!  And a belt.   It needs a belt…

Thursday, June 2, 2011

Spring/Summer Vogue Knits


My love affair with Vogue’s Knitting Magazine continues!  Every time I get a new (or at least new to me; the Local Yarn Shop, LYS for short, usually has a stack of year-old issues for $2.00, which I adore!) issue I flip through the pattern pictures like a kid at Christmas, imagining the feel of wools and silks and cottons, and how each piece would fit with my wardrobe.   I know I’m being exploited by pretty pictures and colors, but I can’t help it! 
Spring/Summer 2011 Issue
In April I flew out to Washington to visit my sister and catch her senior art show opening (side note: It was fabulous!  She did such cool stuff) which made me think back to my college recital days.  All performers expect flowers upon completion of a recital or show, but flowers generally die and get smelly, so I thought I’d knit her something pretty which would not die and smell.  I’d picked up 4 skeins of Katia’s Arc En Ciel in a variegated green (on sale!) at the LYS a few years ago, but hadn’t found the right project, until I found Brooke Nico’s tunic/cover-up (pg 57).  I knit it up really quickly and voila!  Instant art-show congratulatory present!
The yarn looks beautiful in the finished project and fit the style and gauge well (Arc En Ciel is a cotton/acrylic blend, so it even washes well!) but it was kind of finicky to work with.  The yarn strands are formed of knitted thread which means two things; 1. All ends unravel very quickly unless you knot each end (which technically should never be done in knitting) or draw the loose thread through the loops at the end of the yarn, and 2. No matter how careful you are in your knitting, or how blunt the ends of your needles are, you will snag individual threads in the yarn.  Also, knitting all the bobbles was kind of irritating (it is hard to Ktog7!) but they ended up looking really cool as an added texture on the finished garment.  I loved how the lace pattern (knit bottom up) was echoed through the tunic.  And best of all, this was one of those projects that looks better in real life than in the magazine! 
What could be better than this you ask?  Having another 4 skeins to knit myself one….
Spring/Summer Issue 2005
So I know this is an older issue, but it had some cute things in it which I have been waiting to knit for several years, not because I haven’t had the right yarn, but because the patterns have involved the most dreaded of all knitting techniques.  That’s right, techniques so dreaded that they are not actually knitting techniques at all: (dramatic pause) crochet.  I had tried using crochet before with disastrous results (creating terribly tight, tangled yarn messes instead of even fabric) and had generally given in to the knitters’ notion that crochet is an arcane form of yarn-witchery that uses too much yarn for the amount of material produced.  This is not to say that I hated crochet, one of my friends in college crocheted amazing projects (including a bright orange fuzzy hat I wear each time I run in sub-zero weather) but I had avoided it in as much of me doing it.  I figured that I would need to have someone physically show me how to do it, if I wanted to have any success. 
(Side Note: While my mother showed me how to knit in high school, I only half-remembered what she taught me a year later when I was in college, and then I made up the rest using internet knitting videos and trial and error, which is probably why I knit continental and she knits English.  My point is, having learned to knit this way, why would I freak out about teaching myself to crochet?  My answer: I am a pansy!)
The week before heading to Washington (after I knitted my sister’s fabulous tunic) I was looking for something fun and spring-y to knit for myself, and I came back across the lingerie-inspired spread  of knits, and Joan McGowan’s cropped jacket (pg 77).  In my stash I found 4 balls of lily’s Sugar ‘n Cream in natural with a couple balls of purple (I was at Michael’s the other day and have realized two things; there are now a ton of great colors for Sugar ‘n Cream that are really summery and fun and Michaels has cheaper cottons than Jo Ann’s) and decided that it was time to give crochet a second try. 
The pattern calls for worsted weight yarn, and Sugar ‘n Cream calls itself a worsted weight, but I am wondering on what planet that’s true.  I ended up following the directions for XS (a size smaller than I am) and using need 8 needles instead of 9’s and my finished garment is still a little big for me (I’m trying to shrink it as we speak).  On the plus side, the yarn calls for really easy care, and although the label indicates that some of the colors might bleed, the purples I chose didn’t.
The jacket starts off simply enough, being knit flat in several pieces, with a simple lace pattern repeat on the back piece and sleeves.  I’ve started knitting left and right sides and sleeves simultaneously so that any weird tension-things I might have when I knit are in both pieces instead of in one and not the other.  Also, it helps me keep track of shaping, especially if I choose to alter anything from the pattern (I have the bad habit of slightly changing how the shaping is done, and not writing down what I’m doing so that when it comes time to knit side two or sleeve two or sock two, I have to work really hard to figure out what I did the first time).  Maybe I’ll try knitting the fronts and back pieces all at the same time on the next sweater I knit (it may depend on the needle lengths).
After finishing all the pieces, I blocked them to the size S measurements, which was when I realized that they were all slightly larger than I wanted them to be.  But, being me, I kind of hoped that they would work anyways, so when the pieces dried, I sewed them all together and forged ahead into crochet-land!  The trim that the jacked calls for involves the basic crochet stitches chain, single crochet and double crochet.  As a knitter, all of these were surprisingly easy to do!  I went to YouTube and found these great tutorials by theknitwitch, which I practiced with on scrap yarn a couple times until I got the hang of the different stitches. (Single Crochet, Double Crochet, and chain).  I would highly recommend that anyone having trouble with any technique check for video tutorials (or a knitter friend, but YouTube is there at 3 am when you can’t sleep and shouldn’t be knitting anyways!) before giving up!  My only complaint about the crochet edging is that because of the different colors, you end up with a lot of loose threads to finish.  More loose threads than a pair of gloves.  More than in a Fair Isle sweater.  Maybe more than in an intarsia sweater!  In fact, it may have actually taken longer to finish all the loose threads, than learn to crochet, crochet the edging and sew on the button closure.  Freaking threads.


Wednesday, May 25, 2011

300 yd Challenge

I just flew in from Seattle last night (super late and in the middle of a downpour) where I was visiting with my sister for her graduation.  The city has some really beautiful areas and some fantastic museum and shopping experiences.  If you haven't been, try spending some time at the Pike's Place Market (which has a vibe like the old Maxwell Street with street musicians and souvenir vendors, but with fresh fish and coffee everywhere) or the civic center area by the Space Needle (where, apart from the needle there are a bunch of different museums and park areas). 
We stopped at the EMP Museum (next-door to the Needle) and caught the Nirvana exhibit, which was sweet!  The band has always had a special place in my heart, so it was awesome to see so much of their memorabilia and the instruments they played (both smashed and un-smashed).  There were also a bunch of interviews with band members and industry workers about the whole "grunge" movement and their experiences as musicians (click here for the EMP website). 
My sister's graduation (the reason for the trip) went really well; nice (albeit cool and windy) weather and she graduated with high honors!  She's really a very talented potter/printer/office worker, so if you know of anything good in WA, hit me up!  Oh yes, and enjoy the saga of her grad gift (she tells me it will fit right in with her wardrobe, and it fits her!  Drinks all around!).
Twinkle’s Weekend Knits
My little sister just earned her bachelors degree in art, and I wanted to do something special for her as a graduation present.  I picked a project with a reasonable time frame and budget and got to work.  Then I let the project sit in its 80% finished state for a couple months.  And about a week ago I realized that in no universe would I actually finish it in time.
Enter the LYS and Twinkle’s Oceania Sweater (pg 94).  I enjoy knitting with chunky yarns (especially after knitting socks) and had picked up 3 skeins (that’s 300 yds people!) of Donegal Chunky Tweed by Debbie Bliss in green when I flipped through Weekend Knits looking for something my sister needed.  As stated earlier, her favorite color is green, and she is quite stylish.  What does every stylish girl in the Pacific Northwest need?  A chunky wool sweater perfect for rainy weather! 
Donegal Chunky Tweed is 100% wool and is a little scratchy making it perfect for anything textured and/or outerwear.  However, it isn’t quite as chunky as the Twinkle yarns, so instead of using the recommended size 19 needles, I knit Oceania on size 15’s following the stitching directions for a size L, which created a stretchy, more breathable fabric.  I also lengthened the body of the sweater (for better coverage) and shortened the sleeves to three-quarter length.  After finishing, I was  left with a little extra yardage, so I added a front pocket to give the sweater a more casual sweatshirt-like feel, edging the sides in a single crochet. 
My favorite think about Twinkle knits is that they knit up so fast; I think I finished this sweater in 2 days!  Even better, the tie for the sweater is done as a chained crochet stitch, which went way faster than making I-cord (for some reason, the tension of the stitches in my I-cord is always weird and uneven, so it takes me twice as long to knit it).    Lion Brand’s Lion Wool in cocoa worked really well for the tie when quadrupled. 
When all was said and done, I had 2 feet of extra yarn, thereby answering the age old question, can a sweater be knit with 300 yds of yarn?  Yes, yes it can.

Thursday, May 19, 2011

Cabled GPS Cozy!

I haven’t written for a while due to job-hunting, traveling and working on all these projects!  No full-time music job yet, but I keep applying to different positions, so it’s only a matter of waiting for the interview –fairy to call.   So….prepare for knits and quilts and because you've been extra-good, a pattern!
Cabled GPS Cozy
GPS devices are really cool for driving, but they need to be kept with you at all times and protected from the interior of your purse where they might encounter sharp objects like pens, lip gloss or coins.  To solve this problem I give you the cabled cozy (sized for a 3"x 4¾"x ½" GPS).

Materials:
1 set of size 7 double-pointed needles
1 skein of Lion Brand Wool-Ease Chunky in red (or similar yarn; you won't need a full skein)
1 yarn needle for sewing on button and finishing
1 ¾” button
Knitting Directions:
Cast on 32 stitches, join for working in the round, starting with row 1 of Chart 1.
Work Chart 1, rows 1-8.
After row 8 is completed, repeat rows 5-8 until cozy measures 5 ½ inches (or desired length).
Next row: work row 1 of chart 2.  Cast off remaining 16 stitches.
Continue to follow Chart 2, repeating rows 1-4 until flap measures 1 ¾ inches.

Then work rows 5-10 of Chart 2.
Cast off all stitches in pattern.
Lay the tube flat, and sew together the cast-on edge to form the cozy pocket.
Using extra yarn sew the button on the non-cabled side of the cozy. 
Sew any remaining yarn tails into the cozy to finish.
Celebrate your GPS's safety from scratches!