In no particular order, these are my favorite Christmas-related things for this year (prepare for the over-use of exclamation marks!):
1. Hanging out with friends and family: It's always great to catch up with my college friends, and my sister when she's back from WA! (I have to admit, I'm not always great about staying in touch; should fixing that be my New Year's resolution?).
2. Teaching music students: There is nothing more satisfying, as a teacher, than seeing/hearing your students improve and encouraging their love of music!
3. Warm Weather and Christmas Day Running: As a runner who only runs outside (due to finances) this has been the best December in my memory for running outside with all the 40 and 30 degree temperatures! Also, spending Christmas morning running a couple miles with my sister was way more fun than loafing in pajamas by the tree!
4. New Books: One of my favorite things about Christmas is that my mother, the librarian, always finds interesting books for my presents. This year I got Sheepish by Catherine Friend (which you can find on Amazon) which is a hilarious account of the author's conversion from city-dweller, to farmer, to fiber freak! It's a pretty quick read (I think I finished it after 2 days) but includes some interesting historical details on knitting and sheep. Who knew that by taking up knitting I was saving the planet?
5. Pajamas: For as long as I can remember, I've received one new set of pajamas for Christmas every year (which, when you add it up, amounts to a lot of pajamas). This year's set is a purple sheep-y pair!
6. Running Watch: No, my watch is not running away, but I use it when running! My racing goal for the new year is to run at least 1 half-marathon, and this watch is waterproof, and doubles as a heart monitor. Bring on the rainy/windy/snowy/cold/hot days; I'm ready to run!
7. Sweaters: I am slightly embarrassed to admit, as a knitter, that I frequently fall in love with mass-produced sweaters. Pretty much anything that's wool, has cables, is cream and/or has a graphic Fair Isle design makes my heart swoon.
8. The Sound of Music: Who doesn't love this musical?
9. The Hobbit Trailer: Thank you Peter Jackson! As a Hobbit fan, I first had it read to me when I was 6, and have re-read it since many times, I am super excited to see the film when it comes out next Christmas! Yessssss, preciousssss. (If you haven't seen it yet, you should!)
10. Baking: I finally have a Kitchen-Aid (best kitchen tool ever!) which I have been enjoying by making stollen, rolls, biscotti and other delicious things!
Friday, December 30, 2011
Thursday, December 29, 2011
Ravelry and other Procrastinations
It’s been a while since I’ve last posted any knitting (or other) updates here. My goal this year was to post updates at least monthly, but that’s kind of out the window now, and here is why:
It all started in October, when one of my friends from the horn ensemble I play with asked me to cat sit for him, which involved me spending cat time at their house. Because there is only so much time I can spend patting and playing with the furry guys, I stopped by the library to pick up some reads and happened across The KnitGrrrl Guide to Professional Knitwear (which you can find on Amazon).
I imagined that the book would be mostly about the logistics of how to start designing (gauges, mathematics, sizing, etc.) which would be helpful to me, as I had been contemplating how to start doing some designing. I’ve got really good knitting skills, and am good with numbers, and, not being employed full time, I have lots of time which I could devote to design work. However, the KnitGrrrl Guide is actually more about the business end of design. There are sections on where and how you can sell your patterns, shipping codes for Etsy sellers, recommendations for design software (or cheap alternatives), general advice for legal issues like copyright, and interviews with successful designers. The book is also organized very clearly, so if there’s just one subject you want to address, you can find it easily. There is also a section on media and advertising, with the biggest piece of advice (that I came away with) being to create a Ravelry account, friend people and join groups to create a design-base.
I had avoided Ravelry, mostly because I didn’t want to start another account (there are already so many social media outlets out there that I felt like I didn’t need another one) but at the book’s advice, I signed up and joined a couple groups including a designer’s group and a testing group. Since then, I’ve been busy working on test-knit projects, finding new patterns and yarns and new knitting people (instead of updating here). So far, everyone that I’ve talked with and knitted for has been really pleasant and inspiring! And I have done absolutely no new design-work. Go figure!
Be ready for more project updates soon! If you can't wait though, check my project page on Ravelry (ID: Vivaciousknitter).
Tuesday, October 25, 2011
Twinkle Tunic
As fall wears on, we have finally started to get cool weather in the Chicago area (rejoice long-distance runners!) ushering in the start of my favorite time of year: Sweater Season! My love of sweaters has only increased with knitting experience, and it usually takes all my willpower to avoid spending my entire paycheck on the first ones of the season that I see! (Reminding myself of the entire dresser I have that’s devoted to sweaters usually helps). Cables and bobbles and Fair Isle all beckon me dangerously. Must resist urge to knit!
Bobbled Tunic
 While flipping through my many back issues of Vogue Knitting, I came across one of my favorite (visually) sweaters in the Holiday 2006 issue. It is a beautiful chunky tunic by Twinkle featuring the characteristic use of reverse-Stockinette stitch and big yarn (the pattern calls for Cascade’s “Magnum”) for a quick knit. The pattern features a cabled bobble pattern down the front of the tunic, a bobble vine down both sleeves, a front sweatshirt-like pocket, ribbed detailing and a yoked collar.
I’ll be the first to admit that I have a thing for Twinkle sweaters; this pattern especially appealed to me because of its stylish ease (it is proportioned to fit like your favorite sweatshirt, but is infinitely more stylish) and the bobbled texture). However, I had avoided making it because of the expense. Magnum is a beautiful yarn, but at $20.00/skein (that’s an $80.00 sweater even if you are super skinny) it’s out of my price range. Then I wondered if I could achieve the same expensive look and texture of the sweater, but with something a lot cheaper.

Enter the purple Vanna’s Choice by Lion Brand Yarn at the bottom of my stash basket. I’d had this yarn for a couple years as a birthday present from my grandmother, but hadn’t found the right sweater to make from it. I started playing with it, and discovered that when two strands were held together, the knitted texture was almost as big and fluffy as the texture in most bulky Twinkle knits. I used 7 skeins to complete my sweater (with plenty of leftovers) at $2.50/skein (Michael’s seems to have the best sale prices on commercially prepared acrylic yarns) which adds up to a $17.50 sweater. Hello bargain knitting!*
For the bobbled tunic, I used a size 15 needle; the original pattern calls for a size 17, but I found this texture with the double Vanna’s to be a little loose. Because I used a smaller needle size, I followed the stitch directions for the large size, and the measurement directions for the small size (my size!) for the body. However, when I tried knitting the sleeves in this way, they were much too loose, so I followed the stitch directions for the medium size on them.
 The pattern also had some weird measurements for the collar portion of the directions; the pattern suggests that for all sizes, the collar should be worked in Stockinette stitch for 4 inches after the initial decrease round, before completing the rest of the yoke shaping. However, when I did this, the point where the stitching texture switches from reverse-Stockinette to Stockinette fell directly on my bust line instead of above it. So, I ripped back and worked 5 more rounds of rev.-St. stitch (logically extending the cabled pattern at the front) including the first round of decrease shaping for the collar. I then switched to Stockinette for 2 rounds before following the yoke decreases. The pattern suggests that the final collar measurements for all sizes should be 11 inches, which seems pretty silly to me as the distance from above the bust line to the collarbone will differ for taller or shorter women (and different sizes). My completed collar measures 10 ½ inches, with all shaping worked over 4 inches.
Overall, I’m very happy with the way the tunic turned out. It knit up really quickly (I finished it over a couple days) and is warm and cozy, perfect for the Chicago fall!
*Note: Generally, when knitting, I prefer wools over acrylics because of the lasting quality 100% wools have over acrylic and acrylic blend yarns. The sweaters that I’ve knitted in acrylics and blends (especially Lion Brand wool-ease) may be easy to clean and cheap, but they fuzz, loose shape and wear noticeably over time. I’m hoping that Vanna’s will wear much better because it is 100% acrylic.
Monday, October 3, 2011
Pillowcase Pattern
It’s October, and signs of the fall season are now totally unavoidable; everywhere there are trees bursting into colors, there’s a nippy chill in the air, and my annual favorite, the pumpkin spice latte, is back at coffee shops everywhere! So as you dig out your sweaters, woolly socks and heavy quilts, consider getting out your flannel too, for some cozy pillow cases!
Flannel Pillowcases

On my first year out of school I decided to make a quilt for my man’s birthday, and to ensure that he would like it, I had him choose the fabrics (sewers and quilters of the world rejoice, a non-sewer entered a fabric store without much complaining and eye-rolling!). After dragging him away from the polar fleece several times (I tried explaining that polar fleece is not suitable for a quilt) he settled on some manly flannels. The subsequent quilt was a huge success, so much that he has only allowed it to leave his bed to be cleaned once!
 This year, with fall coming on, I started looking at the leftover fabrics from his quilt and realized there was enough for two cozy, flannel pillowcases. I took my measurements from a standard pillowcase and sewed up both pillowcases in a matter of hours; instant gratification is delicious! This would be a great project for a beginner sewer, or a quick housewarming gift since it would be very easy to personalize the pillowcases with almost any kind of fabric. Please note that the fabric amounts are for two standard pillowcases.
Important Notes:
· All seam allowances are for ½ inch.
· All measurements are in inches.

Fabric:
Main Fabric: 1 ½ yard (I’d recommend buying at least 2 yd for one way, stripe or plaid designs; as you can see on my pillows, I did not have enough fabric to match up the plaid pattern.)
Contrast Fabric A: ¼ yd
Contrast Fabric B: ¼ yd
Cutting Instructions:
Main Fabric:
Cut 2 rectangles measuring 22.5” x 39”
Cut 2 rectangles measuring 9” x 39”
Contrast Fabric A:
Cut 2 rectangles measuring 4” x 39”
Contrast Fabric B:
Cut 2 rectangles measuring 3” x 39”
Pillow Assembly:
1. Wash and dry all fabrics thoroughly; this will prevent odd shrinkage and/or dye bleeding later on.
2. Iron all fabrics.
3. Cut out all fabrics according to the listed dimensions.
4. With right sides together, pin the large main fabric rectangle to the contrast fabric A along one of the 39 inch edges. Sew this seam.

5. With right sides together, pin the small main fabric rectangle to the contrast fabric B along one of the 39 inch edges. Sew this seam.

6. With right sides together, pin the contrast fabric A to the contrast fabric B along their remaining 39 inch edges. Sew this seam.

7. Iron all previous seams flat, so that the seam allowances are towards the small main fabric rectangle.

8. Finish all seams (I would recommend using a surger to finish the seams, or using the zig zag stitch on your regular sewing machine).
9. Fold the pillow in half, matching up the seams, and corners of the pillow and pin the edges together. Sew these seams (along the closed end, which is 39” and side of the pillow, which is now 30.5”).
10. Finish these seams.
11. Pin the remaining raw edge (the pillowcase’s opening) at ½ inch, and iron.
12. Pin the folded edge of the pillow to the nearest seam allowance (from the seam between the small main fabric rectangle and contrast fabric B)so that the folded edge is lined up just below the seam, so the seam’s stitches are visible.

13. Hand sew (using an invisible stitch) the pillowcase’s folded edge to this seam allowance.
14. Turn the pillowcase right-side out, and iron.
15. Repeat directions 4-14 for your second pillowcase.
16. Congratulations, you’re done! Put your pillowcases on your pillows and take a celebratory nap!

Saturday, September 3, 2011
Apron Sets
My old college roommate is an awesome girl. You know, the kind who dragged you to frat parties, who plotted revenge on your ex-boyfriend when you broke up, who took you to the doctor’s when you had scarlet fever, and was generally your best friend. My roommate is exactly that kind of girl. It’s been a few years since college, and we’re not as close as we used to be (a big part of this is that she lives in another state now) but still good friends. She’s been married for over a year now, and recently closed on a beautiful house with her husband, which has provided me with the impetus for my next project.
 My roommate has always been into creative activities like knitting (she’s part of the reason I am so obsessed with knitting; we had so many late-night knitting parties on campus) sewing, cooking and gardening. And, while her husband may not knit, he does cook and do other fun things with her. So, I’ve made up a matching “his and hers” apron set for them as a housewarming gift (let’s face it, who does not need a cute flippy apron for their new house?). I bought the fabric for both aprons at Hancock Fabrics and found both patterns online, for free!
Vintage Apron
The Vintage Apron is double-sided with hand-made bias tape (I’ve become hand-made bias tape obsessed lately; it’s really easy to make from fun stripy fabrics, and looks funky) and detachable ties.
 The pattern, which I found here, was easy to understand with very thorough directions and pattern pieces (very home printer-friendly). I would only alter it by sewing the button holes before applying the bias tape; I had some trouble maneuvering my machine with the added thickness. You could also eliminate the button holes and use grommets instead.
Garden Apron
 The Garden Apron is also double-sided (the pattern does not call for this, but as I was using a lighter weight fabric than it recommends, and I thought the resulting garment would be cleaner and more durable) with the same bias tape that I made for the Vintage Apron. I love that it has a bunch of different sized pockets suitable for gardening, kitchen, craft or sewing tools (it seems pretty versitile).
The pattern, found here, has sewn-in ties (if you made the ties longer you could make them detachable like the Vintage Apron as well) and sectioned pockets as well (I sewed the dividers with two lines of stitching for durability). This pattern was not as clearly explained as the Vintage Apron pattern, for example, you need to measure and cut each piece as not pattern pieces are provided. However, the author has provided lot of photos illustrating each step.
I was very happy with the finished result from each pattern; I might even make another Vintage Apron because it’s so cute!
Sunday, August 28, 2011
Vampires and Other Rants
This summer has been a great reading summer for me; I went through the Harry Potter series again (in honor of the last film’s debut) and attacked several books on my “To Read” list including Dune, The Hunger Games series and Twilight. I’ve always enjoyed a good Sci-Fi/ Fantasy read, and as a chronic middle school teacher, I thought it would be good to read some teen literature. While I found The Hunger Games to have some vivid, assertive characters and an engaging story (albeit written for a teen reading level) Twilight was pretty bad. Really bad. Let me rephrase that, it was like word-vomit. I’m left totally astonished that Stephanie Meyer could take a potentially interesting idea for a story (vampires) turn it into utter garbage, get it published and develop an international following! I’ll leave the excessive story bashing to other reviewers (there are some hilarious ones on Amazon, which you can find here) but my main issue with the book is that it is an example of poor writing, with a limited vocabulary, transparent attempts at foreshadowing, under-developed characters and a boring, predictable plot. (I also disliked the book’s insipid “heroine”, Bella, and found her relationship with the vampire, Edward, eerily similar to the Police song “Every Breath You Take”; complete with bad boyfriend flashbacks from my own horrible dating history!)
Moving on…
Vampire Knits
 At the same time that I picked up Twilight at the library, I also checked out Vampire Knits by Genevieve Miller, a collection of vampire-inspired knitting projects. Some of the patterns are Twilight-specific; mittens modeled after Kristen Stewart’s mittens in the first film, knitted totes with expressions from the book (“Be Safe”, “Team Edward”, “Team Jacob”) etc. Others are more loosely inspired and range from the ridiculous (blood type beer cozies and a “Got Blood? pillow) to the sublime (scarves, hooded capes and socks). My favorite knit was the Lore Hoodie (featured on the cover) by Cirilia Rose.
The sweater is knit flat, from the bottom up with the sleeves worked separately in the round (cuff to underarm) and then attached with decreases evenly spaced across the garment as in the yoked variation of raglan shaping. The ribbed border is knit separately (which felt like it took forever, since you're knitting 90 some inches of ribbed border) and then seamed on all around the front edges. The leaf lace pattern was really simple to knit, and was outlined in a chart (yay!). All in all, the sweater-coat would be a good first sweater for the beginning knitter.
 I knitted the small size and started with 7 skeins of Di.ve Autunno yarn (100% merino, in color 25761) but realized when I got to the hood that I needed a few more balls to finish the project. So, I did a few searches on the yarn with the horrible realization that this particular color was not only not being manufactured, but also was impossible to find (admittedly, I brought this on myself, starting a project with a smaller amount of yardage than the pattern called for, and using yarn that I bought 5 years ago). Fortunately, I found that WEBS Yarn was still carrying Autunno yarn in a similar color (25762) which I used to complete the sweater. I split the hood with every other row in the new yarn, and used it by itself for the ribbed band. You can see the slight difference in shading because of the different yarns (which my camera didn't pick up) but I don’t think it looks unpleasant.
 Apart from the “do I have enough yarn panic?!” Di.ve Autunno was wonderful to knit with (why, oh why is Cascade discontinuing it?!). The wool is so soft on your hands that it almost feels like knitting with clouds, although you may split the yarn if you aren’t careful. (I didn’t have too many problems with this, but a beginner knitter might.) The finished sweater is relatively lightweight, but warm, and soft enough that you can wear it against the skin without itching or scratching.
 The button loops were crocheted and then sewn on to the garment (the pattern calls for them to be 5 inches long, but I found that to be too long, so I knotted them) and the buttons were from Color in Stitches, Inc.; I saw them at Stitches Midwest over the weekend (they have some fantastic designs and materials).
 Monday, August 1, 2011
Halloween Quilt

Searching through my stash one day last fall, I came across a Halloween print featuring children dressed in a variety of costumes: vampires, cowgirls, pirates and princesses! It was so cute, that I thought it should be put it a whimsical, child-like quilt! At the same time, I was working through Coffee-Time Quilts (by Cathy Wierzbicki), a quilting book featuring coffee-inspired quilts and quilted projects as well as coffee related recipes. I happened across the Cappuccino Crossroads pattern (pg. 28) which features blocks of print, Nine Patch blocks and Rail Fence blocks. The original pattern features four fabrics; a print, a light, medium and dark. It seemed that this could be the perfect pattern to use for the Halloween print, except that my fabric stash didn’t include enough of one particular color way for all the blocks. For this reason, I chose to break the quilt up into sections of green, orange and purple.

To keep the quilt from becoming too much of a color-splotion, I bordered the blocks with a sparkly black over which I hand appliquéd the “Trick or Treat” and the Halloween objects. I printed up some patterns using Microsoft Word’s Cooper Black font at 400 pt. for the text, and then surfed the internet for fun Halloween images. These patterns seemed to work really well, and (best of all) were free! To finish them, I did a blanket stitch around the edges in different colors using DMC embroidery thread. (In hindsight, I would have done the appliqué on the black strips and squares before sewing the border on to the quilt; the border seemed to be distorted perhaps because of the tensions I put on it when doing the hand sewing).

The quilting was done using a free-motion foot, and features pumpkins and leaves on the body of the quilt, and stars on the borders. I had the idea for both designs from The Free Motion Quilting Project (a fantastic blog by Laura Day) which has a wide variety of free-motion designs and tutorials in varying difficulties. I’ve really come to enjoy free-motion quilting, except that when I’m at it for too long, my back really hurts (not sure if this is because my sewing table is at the wrong height or if I have a bad chair).
The binding bias tape is from a striped green and black fabric (courtesy of my mom’s fabric stash; guess how big it is! Hint: the sign over her stash reads “She who dies with the most fabric wins”). I’ve lately found myself making all the bias tape bindings for my projects; I think they give a more original touch than using Wright’s and sometimes it’s cheaper (if you find a good sale fabric). Once you’ve got the knack for cutting the strips for the tape, it becomes a simple matter of sewing them together, and then slapping it on the quilt!
I suppose that before I call the quilt finished, I should stick a label on it (although I kind of want to wait to title it until I know what I’m going to do with it). This has been drummed into my head for years by my mother and her quilter/appraiser friend; knowing who, where and when a quilt was created adds to its value. However, once the binding is done, I’m not very motivated to add anything more to it.

The backing fabric features a purple Halloween crow print (the crows have little hats and carry pumpkin buckets!) and the same star print as is used for the cat applique. Both fabrics are thanks to my mom's stash again (she has so much fabric!). It all makes for a finished quilt of 59 ½ inches squared Haloween fun!
Sunday, July 31, 2011
Summer Socks
I learned to knit in middle school. My mother taught me, probably because she was trying to occupy me, so I wouldn’t bug her/dad/my sister, or maybe because I thought it was cool; I don’t really remember. My first project was a horrible navy blue acrylic scarf, complete with random increases and decreases, all in garter stitch. Possibly, because the scarf was so horrible, I didn’t knit much until the end of high school, when I took another stab at it with a very warm scarf and hat set. This turned out very well, so when I went off to college that fall, I took some needles and yarn with me, in hopes of starting other projects for Christmas presents for my family (all scarf and hat sets). I also took a skein of acrylic sock yarn with in hopes of teaching myself to make a pair of fuzzy warm socks in which to roam the dorms. My plan only half-worked, though; I learned to knit socks, but when finished they were too small for my feet. By this time, I was too irritated to go back and fix them, so I gave them to my mom. She adored them. And begged me for more! So, for every Christmas (and most Mother’s Days and Birthdays) since, I’ve knitted her another pair of socks.
 Hand-knitted socks are wonderful; even when knit with a lacy open pattern, they keep your feet warm and snuggly all winter long. They are also comfortable, being entirely knit cuff to toe (or visa versa) with no seams. Best of all (for the instant gratification seekers) they are small, knit up quickly, and travel well as projects!
Knitting Vintage Socks
This particular sock project started with Knitting Vintage Socks by Nancy Bush, a great sock resource featuring multiple vintage (mostly lace) patterns worked out for modern children’s, women’s and men’s sizes as well as a good smattering of knitting history. I’ve knitted up 3 of her women’s sock patterns to date (including this one) with different sock yarns, to find that the women’s socks seem to run on the large size (at least for a size 6/7 foot they do). The patterns have fairly simple lace and/or cable stitches, but I do wish that she had included a chart version of the pattern instructions (99 times out of 100 I prefer a chart to written out instructions; it just seems easier to visually manage the chart, and to understand how the pattern works). Also, she titles some of the patterns as child’s or man’s socks, but then the directions are for a woman’s sock. I understand that this is because she got the pattern from a child’s or man’s sock, but it is confusing when you are looking for a specific sock pattern size.
 These socks were knit from the Child’s First Sock in Shell Pattern (pg. 61) in Tofutsies by the South West Trading Company #856, a superwash wool, soysilk fiber, cotton and chitin blend. Chitin, scientifically, is a polysaccharide found in the shells of crabs, lobsters and other delicious crustaceans. It is used as a fertilizer in farming, a stabilizer and thickening agent in food, and as a strong fiber in surgical thread. What this means for knitting is that the chitin fibers act like nylon in the yarn, strengthening the wool against wear (an important feature in sock yarn). The yarn itself, is very soft on the feet, but splits easily when knitting (especially with the small sized needles used for socks) so I wouldn’t recommend it for a first-time sock knitter. The turquoise color, though, is fantastic, especially for an ocean-y pattern like shells!
The shell pattern itself is a very simple lace, but I found it hard to keep track of the number of pattern repeats (vertically). I’m not sure if it was because the pattern sort of twists, or if I was just having trouble counting. The toe and heel were worked with a double thickness of yarn for added durability (I’m not sure if I would do this again, it was kind of a pain to knit the double thickness with the small needles).
Overall, I’m very happy with the resulting socks, especially as these ones are mine!
Saturday, July 30, 2011
Summer Knitting
I’ve heard that there are some knitters out there who actually put down their needles all summer long. (Insert dramatic pause of horror here.) To that I say, what is wrong with you, people! I mean, I understand why you might not start a merino gansey, or even an acrylic afghan in the middle of July, but there are other options! There are some great (affordable) cottons, bamboos and silks which you can always substitute for heavier wool for the summer months. Or, you could work on small projects like socks, baby clothes or mittens, where even if you are working with wool, the project is too little to smother you. On that note, here are a couple summer knitting projects that I’ve completed. Enjoy!
Vogue Knitting Early Fall 2010

One of the best things about my birthday is that (since about sophomore year in college) I receive lots of yarn as presents! This is true, especially of my mom’s friend (whom I have called Auntie since age 2, and has been a sort of fairy godmother of sewing and knitting to my sister and me). Her last birthday present to me was a brown basket and 6 or 7 colorful skeins of Catania yarn by Schachenmayr Nomotta. Having a fall birthday, I didn’t really fancy starting on the Catania right away as it is a 100% cotton yarn, and so it ended up in the bottom of my stash, until two weeks ago when I looked at it and the Vogue Knitting Early Fall 2010 issue and realized that the yarn was destined for one of the patterns within. 

Since the beautiful sleeveless tunic (by Star Athena) was calling my name, and since the pattern called for similarly textured yarn (albeit a wool-cashmere blend instead of cotton) I cast on. The tunic is knit bottom up in two flat pieces and is sewn together at the sides and shoulders (although if you really are seam-phobic you could probably work the first 5 or so inches flat of each piece, and then work in the round until the arm-holes). I knit both the front and back at the same time to ensure an even tension across both. This may seem strange if you are like me, and are a chronic instant-gratification-knitter, but it is worth it to have both pieces knit slowly at the same time, thereby avoiding late nights spent trying to decipher how and why you knit four pattern repeats with six decreased stitches on one side and 5 on the other. (Believe me, I’ve been there!)

As I’ve knit along both sides, I’ve come to appreciate the beautiful drape and stitch definition the Catania yarn has. This is especially important with all the cables, ktb’s and the twisted stitch bunches, which border the hem and bust. (Side note: the twisted stitch bunches look complicated, but were actually really easy to knit and add such a cool textural element!) With the cotton yarn, the finished garment is breezier for summer, and softer on the skin. I’d definitely knit with it again (if I had more of it, especially a solid color) probably something lacy or cable-y as it seems to show both techniques well.
Friday, June 17, 2011
Harry Potter Knitting
Growing up with a librarian mother, I have always been a book-lover. I fondly recall the hours spent in the basement-children’s section of her library with my good friends Bilbo and Frodo, Charlie, Peter Pan, Alice, Bastian and of course Peter, Edmund, Susan and Lucy. Unsurprisingly, my favorite birthday presents were books and bookstore gift cards. It was just after my eleventh birthday, that I convinced my parents to take me to the local Borders where I first picked up Harry Potter and the Sorcerer’s Stone. I remember reading the cover and being interested (having read, quite indiscriminately, any fantasy or science fiction book I could get my hands on) so much that I had read the first chapter before leaving the store. After tearing through the story at super-human speed, I discovered (to my great delight) that there was more!
Now, of course, both Harry and I are grown, he defeating the evil Lord Voldemort, and I… well… I read about him defeating Voldemort, does that count? And, with the final installment of the Deathly Hallows due in theaters this July, we are finally at the end of a rather magical era; no more waiting in line for midnight movie showings, no more Harry Potter costume parties, and sadly, no more books! I therefore offer up this knitting experience to you as one last Harry Potter hurrah. Raise your goblets (filled with pumpkin juice and butterbeer, no doubt!) and join with me in a toast to the Boy Who Lived, and the Woman Who Brought Him to Life!
Harry’s Christmas Socks

As most Harry Potter fans who are also knitters will tell you, Rowling includes characters who knit in almost every book in the series. Mrs. Weasley sends Harry and Ron lovely knitted sweaters every year for Christmas, Hermione learns how to knit wooly hats and scarves for the Hogwarts House-Elves and even Hagrid knits some sort of yellow circus tent (in the Sorcerer’s Stone if you were wondering). It should come as no surprise, then, that house-elves, those creatures most gifted in cleaning up after humans and practicing the domestic arts, are accomplished knitters!
Dobby now handed Harry a small package, which turned out to be --- socks.
“Dobby is making them himself, sir!” the elf said happily. “He is buying the wool out of his wages, sir!”
The left sock was bright red and had a pattern of broomsticks upon it; the right sock was green with a pattern of Snitches.
“They’re … they’re really … well, thanks, Dobby,” said Harry, and he pulled them on, causing Dobby’s eyes to leak with happiness again.
(Excerpt from Harry Potter and the Goblet of Fire, Chapter Twenty-Three: The Yule Ball, by J.K. Rowling)

I get the feeling that Harry might have found those socks a bit strange (can’t imagine why) but they sounded delightful to me, so I was thrilled to discover a pattern for them in Alison Hansel’s book of knits based on those described in the Harry Potter books and films, Charmed Knits (pg. 104-108). Her pattern features two repeats of a Fair Isle snitch and broomstick patterns on each cuff with identically worked short row toes and heels. Her instructions were easy to follow (although, the explanation for the short row toe/heel was not with the snitch/broomstick sock pattern, so you do need to skip around in the book a bit) and the short row toe/heel knit up quickly. I am not a big short row toe/heel fan because the heel does not end up being particularly reinforced (and we all know that socks are the only knitted clothing items that wear out) and because you end up using the Kitchener Stitch to graft together 32 stitches to finish the toe, which takes a lot longer than grafting 8 stitches for a conventional toe. However, if you are an apprehensive first time sock knitter, the short row heel would probably be the easiest heel to work.

For the second pair of Harry's Socks that I knitted, I decided to knit them my way, with a longer cuff on each sock featuring only one repeat of the broomstick motif, and two repeats of a shortened snitch motif (for this I skipped working rows 10, 11 and 12 of the snitch chart on pg 108). (I think the snitches look more “snitch-ly” with a more round golden ball). I also worked the heels and toes in gold for both socks (because they look pretty!) knitting a heel flap, turn and gusset, as well as a more conventional toe (scroll down for directions).

When knitting Fair Isle motifs, I usually like to use only one kind of yarn for a uniform look. However, for these socks I ended up using Aussi Sock by Oasis Yarn (an Aussi Merino/Nylon blend in Oak Moss, Natural and Cherry Tomato that is super soft) with either Trekking XXL or Opal (both are wool/nylon blends as well, in gold and variegated brown). (I actually don’t know which brand of yarn I used for the gold and brown colors because I started these socks a long time ago, and either lost or ate the ball bands, but I have a suspicion that both yarns are Trekking XXL because they look/feel like it). The Aussi is a little bit fluffier than the Trekking, but I think that for the Fair Isle pattern, the combination of yarns looks really good.
For more Harry Potter-inspired knitting check out Hansel’s book or click here for a great (free!) listing of patterns and links. Also, Opal created a line of variegated sock yarns based on Harry Potter characters (which is out of production, but you might find is floating around at your yls!). Happy Knitting!
My Heel and Toe Directions:
Heel Flap:
Work sock until it is the desired length to the heel. Then knit 16 stitches past beginning of round and turn work (knitting flat) knitting the heel flap on the next 32 stitches (starting with a WS row) with alternating rows of RS: sl 1 k 1, WS: sl 1, P to end.
Turn Heel:
When heel flap is desired length (14 or 15 slipped stitches at the side of the flap), on RS, K 17, ssk and K1, turn work, Sl 1, p3, p2tog, p1 and turn, continue to work as follows, knitting to 1 stitch before gap and ssk k1 on the RS rows and purling to 1 stitch before gap and p2tog p1 on WS rows until all stitches of the heel flap have been worked.
Gusset:
Needle 1: Knit across all heel flap stitches and then pick up and knit 15 stitches on the side of the heel flap. Needle 2: Knit across the stitches for the top of the foot. Needle 3: Pick up and knit 15 stitches from the other side of the heel flap, then knit 9 stitches of the heel flap. This is where each round now begins. Row 1: Knit on needle 1 to the last 3 stitches, k2tog k1, knit all stitches on needle 2, k1 ssk then knit remaining stitches on needle 3. Row 2: knit. Repeat these two rows until 64 stitches remain total.
Toe Decrease:
Row 1: On needle 1, knit to last three stitches, k2tog, k1, on 2nd needle k1, ssk knit to last 3 stitches k2tog k1 and on needle 3 k1, ssk knit to end of needle. Row 2: knit. Repeat rows 1 and 2 until 16 (or desired amount of) stitches remain. Then, using the Kitchener Stitch, graft the toe together. (My favorite explanation of the Kitchener Stitch is from Knit Christmas Stockings edited by Gwen Steege, page 93, because of the easy to follow illustrations! That book is how I learned to knit socks.)
Friday, June 3, 2011
One More for Winter!
And this brings us almost to date with my finished projects, or at least the Vogue Knitting ones!
Winter 2009/2010 Issue
Winter 2009/2010 Issue

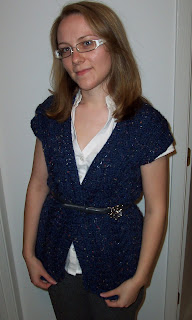
I know that we are getting on towards summer, and that very soon I will (like all Chicagoans) start complaining about the heat and the cost of AC, but when I found the Karen Garlinghouse vest on page 54, I had to knit it. (And let’s face it; the weather has been chilly lately, so a chic, business-casual vest is perfect for the weather!) While knitting textural elements like cables is time-consuming when there are a million cables in every other row, I adore how cables look (which explains why most of my sweaters feature cables).
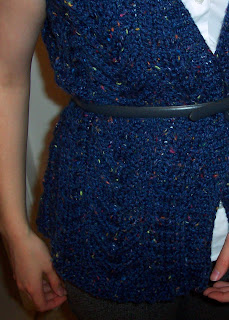
I pulled 5 skeins of Patons Shetland Chunky Tweed in blue from my stash, which is technically 1 skein short of the yardage called for in the pattern ( a fact I chose to ignore while obsessively checking that Patons was still making their Shetland Chunky Tweeds; they are). I shortened the vest’s length below the waist by 3 inches shortened and knitted a narrower collar to compensate for the wrong yardage, which worked pretty well; I have 2 yds of the yarn left over. (Admittedly, the collar change did not begin as a purposeful alteration...the vest collar and left and right sides finishing instructions were not clear to me until I had put the left and right sides’ ribbing in wrong, and at that point I decided to leave them and change the collar).

The biggest Issue with this vest (besides me reading the collar and sides ribbing wrong) was that the yarn bleeds. My hands don’t sweat much as I knit (or ever for that matter), but I did end up with blue fingernails and palms. I’m not sure if the yarn dyed my needles; they just happened to be blue. I just washed the vest (in the washing machine in cold water on gentle, as the label suggests) which caused the yarn to pill and fuzz a bit (this always saddens me) but it appears that the vest no longer bleeds. Cross your fingers that I can pair it with a breezy cream top! And a belt. It needs a belt…
Subscribe to:
Comments (Atom)